Showing posts with label natural building. Show all posts

Wednesday, February 2, 2011

New Stove Pipe...

Our house made of mud with the new stove pipe from the roof...


Another view...


We are warm. And the large windows on the south side of the house make good use of passive solar. We are happy with the performance of the house this winter---even though we haven't completed all the walls yet. It's put together with duct tape and chewing gum...

Tuesday, February 1, 2011

The Wood Stove!!

Okay, the computer is fixed, so I can catch you up a bit. Please excuse the clutter in the following photos---but hey, its real life.

On Dec. 29, Joni and I made the base that will hold the Wood Stove. Start with concrete blocks and some gravel...

Then we put the slate that Joni picked up along the Ridge. We mortared that into place..

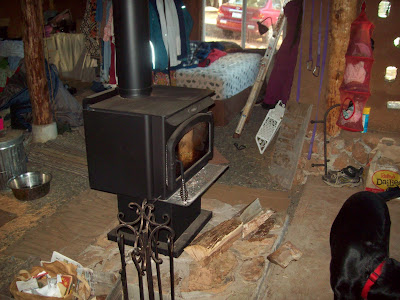
And here is the new Wood Stove. A bit dusty from a month's worth of use..


Another photo of it. This is a Lennox. Super efficient, it has only 25 percent of the emissions of a normal wood stove.


It only took us 2 1/2 years to put this thing in. Many, many nights of sleeping in sleeping bags as the temps dropped below freezing. That which doesn't kill us....


Friday, November 12, 2010

Making Earthcrete...

I've been working on putting the second coat of mud on the house. With winter rains bearing down on us, it is important to get a water impermeable layer on the house. The mud held up well during its first winter---but I think it would be pushing it to not get something more water resistant up.

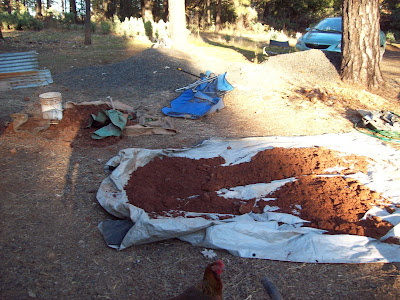
So I take two parts clay, one part sand, two parts straw and 1 part cement mix and add water. The result is a nice plaster that is resistant to rain. It works great...

Our lone chicken watches over the work...


The problem has been the clay. It is impossible to dig up in the summer without a pick axe. Now it is diggable, but needs to dry in order to sift it to make plaster. My solution? Let it dry in the sun...


We shall continue with this work for the next few days....

Friday, October 29, 2010

After Two Years and Four Months...

We have a usable Family Room for the winter! And the whole Addition is tightened up with makeshift insulation. It ain't done; it's usable though!

Here Joni enjoys NCIS while lounging in her favorite chair...

Another view...

I can't tell you how many times I've moved these books through the years...


Doo, Doo, Doo Looking out my front door...


The Tin Wall...


Our new dog, Abbey--enjoying the Futon...

And so now the Cabin part becomes a kitchen/dining room/computer nook...


For two winters we (four humans and one really big dog) lived in this 350 square foot Cabin during the everlasting rains. I don't recommend doing that. Thank heavens that is behind us now...


Progress!! The Addition itself does tend to hold the heat in very well. We don't have a woodstove in there yet (maybe in December?). But all in all, the warm days and cooking in the oven seems to warm everything up to a tolerable level.


Wednesday, October 27, 2010

The Inside Tin Wall..

My friend Mark flew out from Minnesota to spend a week with us. We had originally planned on taking a couple days to do some backpacking. However, when Mark saw the vast amount of work to be done around here, he graciously decided that the time would be better spent helping us out.

Mark's exact words were: "wow, this is really rustic". He had a puzzled and somewhat perplexed look on his face. I'm thinking he was a tad overwhelmed. And maybe a little bit disoriented as to why a family would choose to live this way.

We decided to finish an interior wall. This meant putting up blue jean insulation and then covering it with 95 year old tin.


It took us a couple of days to complete this project...


Here you can see the blue jean insulation prior to putting up some tin.


The finished project...


Another view...
Of course, it isn't really done. We plan on opening up the doorway into the original cabin. The tin needs to be washed, buffed up with steel wool and then treated with linseed oil to make it shine.

Our intention is to make it look like a combination gas station/barn/brewery. The old look. Yeah, I know---it is weird. But I kind of like it...

Saturday, October 2, 2010

Dirt Cottage Living

Getting ready for winter. Although this time we will have a family room. Here it is--not all the way decorated but you get the idea...

Dogs wrestle...


And our bedroom...


Modern Dirt Living...


Tuesday, September 28, 2010

Joni Keeps Working...

I've been sick. Joni gets working away. Everyday making Cob and Clay Slip..

Our Antler Hangers...


And the front entryway...


Joni making Clay Slip...


Where she has been tightening up the top of the North Wall...


Sunday, September 19, 2010

Sleep-Over Kids Make Cob and Clay Slip...

Have Joy while making mud!

And remember to smile..

Get your hands dirty...


Get your feet dirty....


And aim high in life...


The Lessons of working with Mud...


Thursday, September 16, 2010

Antler Hangers...

While I've been hiking the Appalachian Trail, Joni has been working on the house. She put these Antlers into the Cob today. A place to hang scarves and mittens...


And the other side of the entry door. It has cool glass jugs in the Cob...


And she did some more Clay Slip work on the outside of the house.


Okay. Play time is over for me. Time to get back to work....


Wednesday, September 1, 2010

Joni's Work

Joni's been working on the house, while I've been away working. More Cob work done on the front entryway...

And she has almost finished Clay Slipping an exterior corner..

Slow Progress...

Saturday, August 14, 2010

More Clay Slip Work

Little by little, this summer is getting away from us. Going too fast! I fear we will run out of summer before the house is done. We continue the work of extending the Clay Slip to the top of the structure.


And I've started digging the clay next to the house. Two birds with one stone: dig the clay for the French Drain (or is it Trench Drain?) and also get clay for the house. I have to use a pick to loosen up the dirt. Hard, honorable work.


Tuesday, August 3, 2010

Floors! Mud Plaster! Tightening Up!

A productive day. It is tough to get a photo of the floor...so this will have to do. We have about 30% of the first, insulative layer of straw and clay down on the inside floor. We plan on finishing this section first, and then moving on to the other sections.

Joni and my daughter working on making clay slip for the floor...

Then we moved outside, where we finished putting the first layer of mud on the tall part of the Addition.


Another view...


Joni putting the last bits on another side of the house (the north side):

Previously, Joni has been working on finishing the cob work around our front door. Notice the old license plate which is embedded in the mud above the door. On the side we have old pickle jars set into the cob. We also put in a cat door so Rocky can come and go as he pleases. He likes that!


And the job of tightening up all the gaps has started. This afternoon we made clay slip to start tightening up the Addition. All those gaps where the bales don't meet the roof will be filled in by clay slip...

A good productive day. I like working on different projects at once. Helps with the monotony...